This is default featured slide 1 title

Go to Blogger edit html and find these sentences.Now replace these sentences with your own descriptions.

This is default featured slide 2 title

Go to Blogger edit html and find these sentences.Now replace these sentences with your own descriptions.

This is default featured slide 3 title

Go to Blogger edit html and find these sentences.Now replace these sentences with your own descriptions.

This is default featured slide 4 title

Go to Blogger edit html and find these sentences.Now replace these sentences with your own descriptions.

This is default featured slide 5 title

Go to Blogger edit html and find these sentences.Now replace these sentences with your own descriptions.

Friday, December 28, 2012

How to Root Samsung Galaxy SIII GT-i9300

Samsung ကေနာက္ဆံုးထုတ္လိုက္တဲ့ Galaxy SIII Root လုပ္နည္းေလးပါ. လုိအပ္မည့္သူမ်ား  ရွိၾကမယ္ထင္လုိ ့  ဒီ post ေလးကုိေရးလုိက္ပါတယ္.
 Root မလုပ္ခင္ လုိအပ္မည့္  Galaxy SIII ရဲ ့ Driver . Odin V.3.04 .. CF-Root-SGS3-v6.3.tar တုိ႔ကုိ ေအာက္မွာ
Download ယူလုိက္ပါ... Driver ရွိျပီးသားဆုိရင္ေတာ့ မလုိေတာ့ပါဘူး က်န္တဲ ့ ႏွစ္မ်ဳိးကုိသာ Download ယူလုိက္ပါ။

All Mobile Secret Code 2013 (သိထားသင့္တဲ႔ Mobile Secret Code မ်ား)

all mobile secret code, nokia cable finder, 2013


 Mobile Phone ေတာ္ေတာ္မ်ားမ်ားရဲ႕ Secret Code ေတြစုစည္းေပးထားတဲ႔ Program ေလးပါ Mobile ျပင္သူေတြ သိထားသင့္ ေဆာင္ထားသင့္တဲ႔ Software ေလးပါ...။
 

Free Download All Mobile Phone Secret Code Like, Nokia, Samsung, LG, Motorola, China and All Others Mobile Phone. This is an excelent application for Mobile Secret Code Collection and Nokia Cable Finder Solution. Download All Mobile Secret Code Application 2013 Free and Enjoy.

Sony Phone မ်ား unlock bootloader လုပ္နည္း & Root လုပ္နည္း


Sony Phone မ်ား အတြက္ unlock bootloader လုပ္နည္းေလးပါ ။
Sony Phone  လို႔ေခၚတာလည္း Sony က Erricsson နဲ႔ ကြဲသြားပီးဆိုေတာ့ Sony Erricsson လို႔ မေခၚေတာ့တာျဖစ္ပါတယ္ ။
Sony ဖုန္းေတြမွာ ျမန္မာစာ ျမင္ရဖို႔ Root လုပ္မယ္ဆိုရင္ အရင္က unlock bootloader ဆိုတာ လုပ္စရာမလိုပဲ အဆင္ေျပပါတယ္ ။ အရင္  S E X (Sony Erricsson Xperia) ေတြမွာ Build number မွန္တယ္ဆို DooMLoRD လို bat ဖိုင္ေလး Run ပီး Root လိုက္လို႔ရတယ္ ။ Build number ကို ခ်ိန္းတယ္ဆိုရင္လည္း Flash လိုက္တယ္ ဆိုရင္ Root လို႔ပီးသြားတာပါပဲ ။ ကၽြန္ေတာ္ သိသေလာက္ ခုေနာက္ပိုင္း Erricsson နဲ႔ ကြဲပီး Sony ဖုန္းေတြမွာ Unlock BootLoader လုပ္ေပးမွ အဆင္ေျပပါေတာ့တယ္ ။ Sony ေတြ Root လုပ္မယ္ဆို Unlock BootLoader ရမယ္ဆို အဆင္ေျပေအာင္ ေရးထားလိုက္ပါတယ္ ။

* Unlock bootLoader လုပ္တယ္ဆိုရင္ေတာ့  Guarantee ပ်က္တယ္လို႔ ဆိုပါတယ္ ။ ကၽြန္ေတာ္တို႔အတြက္ေတာ့ သိပ္မလိုဘူး ထင္တာပဲ :)

Unlock BootLoader လုပ္နိုင္တဲ့ ဖုန္းေတြကို http://unlockbootloader.sonymobile.com/ မွာ ၾကည့္ရွုႏိုင္ပါတယ္ ။

ေသခ်ာေအာင္ ထပ္ပီး စစ္ေဆးမယ္ဆိုရင္ ..

*#*#7378423#*#* > Service info > Configuration > Rooting Status မွာ Bootloader unlock allowed မွာ Yes ဆိုရင္ Unlock စလုပ္လို႔ရပါပီ ။

* Unlock လုပ္ေတာ့မယ္ ဆိုရင္ လိုအပ္တဲ့ File ေလးကို Download ခ်ပီး ရယူထားပါ ။

Unlock BootLoader လုပ္မယ္ဆို Unlock Code ရဖို႔ ပထမဆံုး စတင္လုပ္ေဆာင္ရမွာျဖစ္ပါတယ္ ။
အဲ့အတြက္ Unlocking the boot loader ကို သြားရပါမယ္ ။ ၿပီးရင္ ေအာက္နားက  Start unlocking the boot loader  ကိုႏွိပ္ပါ ။ ေနာက္ ၁ မ်က္ႏွာေရာက္ရင္  Continue  ဆက္ႏွိပ္ပါ ။  ေနာက္ ၁ မ်က္ႏွာ ထပ္ေရာက္တယ္ဆိုရင္  Yes, I’m sure  ကို ဆက္ႏွိပ္ပါ ။


Legal terms Page ကို ေရာက္တယ္ဆို Check box ႏွစ္ခုလံုးကို Click လုပ္ၿပီး  I Accept  ကိုႏွိပ္လိုက္ပါ ။


Create Unlock request Page ကို ေရာက္သြားရင္ ... .. .
Name , IMEI , E-mail ေတြ ျဖည့္ေပးရပါမယ္ ။ IMEI ဆိုတာ သိဖို႔လိုလာပါပီ ။ မိမိ IMET Number ကို သိခ်င္တယ္ဆိုရင္ေတာ့ *#06#  ကိုႏွိပ္လိုက္တယ္ဆို IMEI Box ေလးေပၚလာပီး အဲ့ထဲမွာ ပါလာတဲ့ Number ၁၅ လံုးပါ ။ ဒါေပမယ့္ IMEI ထဲကို ထည့္မယ္ဆိုရင္ ေနာက္ဆံုး Number ၁ လံုးကို ခ်န္ထားပီး အေရွ႕က Number ၁၄ လံုးကို ရိုက္ထည့္ရမွာ ျဖစ္ပါတယ္ ။ ေသခ်ာပီဆိုရင္  Summit  ႏွိပ္လိုက္ပါ ။
အဲ့ဒါဆို Unlock Code ကို ျပန္လည္ျပတဲ့ Page ေပၚလာပါလိမ့္မယ္ ။ Unlock Code ကို ေသခ်ာမွတ္ထားလိုက္ပါ ။

ခုေနာက္ပိုင္း အဆင့္ေတြက အေရးႀကီးတဲ့ အတြက္ ေသခ်ာ ဂရုစိုက္ျပဳလုပ္ေစလိုပါတယ္ ။

*  Setting>Application>unknown sources ကို အမွန္ၿခစ္ပါ
*  Setting>Application>Development>Usb debugging ကိ္ု အမွန္ၿခစ္ေပးပါ

 ၁ ။ Download လုပ္ထားေသာ ဖိုင္ကို Extract လုပ္ လိုက္ပါ ။ fastboot_with_Android_USB_file နဲ ့ drivers ဆိုတာကို ေတြ႕ပါလိမ့္မယ္ ။ အဲ့ဒီ File ၂ ခုကို လည္း Extract ထပ္လုပ္ထားပါ ။ fastboot_with_Android_USB_file ထဲက Fastboot က Unlock လုပ္ဖို႔အတြက္  Folder ပါ ။ Drivers ကေတာ့ S1Boot Fastboot Driver ကို စက္ကမသိရင္ အသံုးျပဳဖို႔အတြက္ပါ ။

 ၂ ။ မိမိ ဖုန္းကို (Shutdown) ပါဝါ ပိတ္လိုက္ပါ ။

 ၃ ။ Usb ၾကိဳးနဲ႔ Computer ကို ခ်ိတ္တယ္ဆို ဒီတိုင္းခ်ိတ္လို႔မရပါဘူး ။ ခ်ိတ္ရမွာ သံုးရတဲ့ နည္းေတြလည္း မတူပါဘူး ။


Menu button
(for Xperia™ arc, Xperia™ arc S, Xperia™ neo, Xperia™ neo V, Xperia™ pro).

Search button
(for Xperia™ PLAY).

Volume up button
(for Xperia™ mini, Xperia™ mini pro, Xperia™ ray, Xperia™ active, Live with Walkman™, Xperia™ S, Xperia™ P, Xperia™ U, Xperia™ Go, Xperia™ Sola, Xperia™ acro S).
 

ကိုယ္ဖုန္းနဲ႔ ကိုက္မယ့္ Button ေလး ႏွိပ္, Computer Usb ၾကိဳးနဲ႔ မိမိ ဖုန္းကို ခ်ိတ္ဆက္လိုက္ပါ ။
မိမိလုပ္ေဆာင္ခ်က္ မွန္ကန္တယ္ ေအာင္ျမင္တယ္ဆိုရင္ မီး အျပာ ေရာင္ေလး လင္းလာပါလိမ့္မယ္ ။
မီး အျပာ ေလး မလင္းဘူး အဆင္မေျပဘူးဆိုရင္ အဆင့္ ၃ ကို ေသခ်ာ ျပန္ဖတ္ၿပီး ျပန္လုပ္ပါ ။

 ၄ ။ မီး အျပာ ေလး လင္းလာပီး ခဏေလး ေနရင္ Driver ကို ရွာပါလိမ့္မယ္ ။ သူ႔ဘာသာ Auto ရွာပါလိမ့္မယ္ ။ ရွာေနတဲ့ Driver က S1Boot Fastboot ျဖစ္ရပါမယ္ ။ တျခား usb mass storage လိုမ်ိဳး တျခား Driver ဆိုရင္ အေပၚက နံပါတ္ ၃ အဆင့္ မွာ အဆင္မေျပ မွားခဲ့လို႔ပါ ။ S1Boot Fastboot ကို ရွာတာမေတြ႕လို႔ အဆင္မေျပဘူးဆိုရင္ ကိုယ့္ဘာသာ အေပၚက Down တုန္းက ပါခဲ့တဲ့ Drivers Folder ကို ရွာပီးေရြးေပးလိုက္ရင္ရပါတယ္ ။

 ၅ ။ S1Boot Fastboot ကိုလည္း သိပီဆိုရင္ Down ထားတဲ့ Folder ထဲက Fastboot ဆိုတဲ့ Folder ထဲကို ဝင္ပါ ။ ပီးရင္ Folder ထဲက ေနရာလြတ္ ၁ ေနရာမွာ Shift+Mouse Right Click >Open command window here ကို ေရြးလိုက္ပါ ။ Command Prompt ၁ ခု တတ္လာပါလိမ့္မယ္ ။ (Shift+Mouse Right Click >Open command window here ကိုဘာလို႔ သံုးလည္းဆိုေတာ့ အခုဖြင့္ထားတဲ့ Fastboot Folder တည္ေနရာကို တန္းေရာက္ခ်င္လို႔ပါ ။ Command သံုးေနက်မဟုတ္ တဆင့္ခ်င္း သြားရင္ အမွားမ်ားပီး ၾကာနိုင္လို႔ပါ )

 ၆ ။ Command Prompt ေပၚလာပီ ဆိုရင္  fastboot.exe -i 0x0fce getvar version  ဆိုတာ ရိုက္ပီး Enter ႏွိပ္ပါ ။

 ၇ ။ ေနာက္ ၁ ေၾကာင္းကေတာ့  fastboot.exe -i 0x0fce oem unlock 0x(Unlock Code) ဆိုတာ ရိုက္ပီး Enter ထပ္ႏွိပ္ပါ ။ (  " (Unlock Code) ဆိုတဲ့ေနရာမွာ Unlocking the boot loader page က စလုပ္ခဲ့ပီး ေနာက္ဆံု ရလာခဲ့တဲ့ Unlock Code (or) ရလာတဲ့ Number ကို ေျပာင္းပီး ျဖည့္ေပးရမွာျဖစ္ပါတယ္ ။ '(' ')' ေတြကိုပါ မထည့္ရပါဘူး )

 ၈ ။ Enter ေခါက္လိုက္ပီ ဆိုတာနဲ႔ Lock စတင္ပီး ျဖည္ပါၿပီ ။
 OKAY [xx.xxs]
 finished. total times :xx.xxs

Finished ဆိုတဲ့ Message ေလး ေပၚလာပီ ဆိုရင္ Unlocking လုပ္တာ ေအာင္ျမင္စြာ ၿပီး ဆံုးသြားၿပီ ျဖစ္ပါတယ္ ။

Xperia™ Go - Root လုပ္နည္း

Xperia™ Go ကို Root လုပ္မယ္ ဆိုရင္ ပထမဆံုး Unlocking The BootLoader လုပ္ရပါမယ္ ။
Unlocking The BootLoader လုပ္နည္းကို အေပၚက ပို႔စ္ကို   ေလ့လာနိုင္ပါတယ္ ။

Xperia™ U ကို Root လုပ္ဖို႔ ေအာက္က elf file ေလးကို ေအာက္က Download Link မွာ ရယူပါ ။

Unlocking The BootLoader လုပ္ပီးသြားပီ Unlock ျဖစ္သြားပီ ဆိုရင္
 * Setting>Application>unknown sources 
 * Setting>Application>Development>Usb debugging ေတြမွာ အမွန္ျခစ္ပီး ဖြင့္ထားလားစစ္ပါ ။ မဖြင့္ရေသးရင္ အရင္ဆံုးဖြင့္ပါ ။

Service ကို ဖြင့္ပီးသြားပီ ဆိုရင္ ဖုန္းကို ပိတ္လိုက္ပါ ။

Download ရလာတဲ့ rootxperiagobyfmam.elf File ေလးကို Fastboot ဖိုင္ထဲကို ထည့္ေပးပါ ။ (Fastboot Folder ေလးက Unlock လုပ္ပီးသြားပီဆိုရင္  Unlocking The BootLoader ထဲမွာ ေဒါင္းထားတဲ့ unlock bootloaders.zip ထဲမွာ ပါထားပီးသား ျဖစ္ေနလို႔ ရွိေနပီထင္ပါတယ္ )

Volume Up Button ေလး ႏွိပ္, Computer Usb ၾကိဳးနဲ႔ မိမိ ဖုန္းကို ခ်ိတ္ဆက္လိုက္ပါ ။
မိမိလုပ္ေဆာင္ခ်က္ မွန္ကန္တယ္ ေအာင္ျမင္တယ္ဆိုရင္ မီး အျပာ ေရာင္ေလး လင္းလာပါလိမ့္မယ္ ။

rootxperiagobyfmam.elf File ထည့္ထားပီးသား ျဖစ္ေနတဲ့ Fastboot Folder ကို ဖြင့္လိုက္ပါ ။ ပီးရင္ Folder ထဲက ေနရာလြတ္ ၁ ေနရာမွာ Shift+Mouse Right Click >Open command window here ကို ေရြးလိုက္ပါ ။ Command Prompt ၁ ခု တတ္လာပါလိမ့္မယ္ ။ 

Command Prompt ေပၚလာပီ ဆိုရင္ ေသခ်ာေအာင္  fastboot devices  ဆိုတာ ရိုက္ပီး Enter ႏွိပ္ပါ ။ fastboot ဆိုတာ ေပၚလာပါလိမ့္မယ္ ။

နာက္ ၁ ေၾကာင္းကေတာ့   fastboot flash boot rootxperiagobyfmam.elf  ဆိုတာ ရိုက္ပီး Enter ထပ္ႏွိပ္ပါ ။

Finish လို႔ေပၚလာပီ ဆိုရင္ Usb ၾကိဳးကို ျဖဳတ္လိုက္ပါ ။ ပီးရင္ Power ဖြင့္လိုက္ပါ ။ Application ေတြ ထဲမွာ SuperUser  ဆိုတဲ့ အေကာင္ေလး ေတြ႕ပီ ဆိုတာနဲ႔ Root လုပ္ျခင္း ေအာင္ျမင္စြာ ပီးစီးသြားပီ ျဖစ္ပါတယ္ ။ အားလံုး အဆင္ေျပၾကပါေစ ။

 * Xperia™ Go - Build No, 6.0.B.3.184 ကို Root လုပ္ပီး ေရးထား တာျဖစ္ပါတယ္ ။ Sony ေတြမွာ Android Version ထက္ Build No ကို ၾကည့္မွ အဆင္ေျပပါတယ္ ။ Build No က အေသခ်ာဆံုးျဖစ္ပါတယ္ ။

Xperia™ U - Root လုပ္နည္း


Xperia™ U ကို Root လုပ္မယ္ ဆိုရင္ ပထမဆံုး Unlocking The BootLoader လုပ္ရပါမယ္ ။
Unlocking The BootLoader လုပ္နည္းကို အေပၚမွာ ေလ့လာနိုင္ပါတယ္ ။

Xperia™ U ကို Root လုပ္ဖို႔ ေအာက္က elf file ေလးကို ေအာက္က Download Link မွာ ရယူပါ ။


Unlocking The BootLoader လုပ္ပီးသြားပီ Unlock ျဖစ္သြားပီ ဆိုရင္
 * Setting>Application>unknown sources 
 * Setting>Application>Development>Usb debugging ေတြမွာ အမွန္ျခစ္ပီး ဖြင့္ထားလားစစ္ပါ ။ မဖြင့္ရေသးရင္ အရင္ဆံုးဖြင့္ပါ ။

Service ကို ဖြင့္ပီးသြားပီ ဆိုရင္ ဖုန္းကို ပိတ္လိုက္ပါ ။

Download ရလာတဲ့ rootxperiaubyfmam.elf File ေလးကို Fastboot ဖိုင္ထဲကို ထည့္ေပးပါ ။ (Fastboot Folder ေလးက Unlock လုပ္ပီးသြားပီဆိုရင္  Unlocking The BootLoader ထဲမွာ ေဒါင္းထားတဲ့ unlock bootloaders.zip ထဲမွာ ပါထားပီးသား ျဖစ္ေနလို႔ ရွိေနပီထင္ပါတယ္ )

Volume Up Button ေလး ႏွိပ္, Computer Usb ၾကိဳးနဲ႔ မိမိ ဖုန္းကို ခ်ိတ္ဆက္လိုက္ပါ ။
မိမိလုပ္ေဆာင္ခ်က္ မွန္ကန္တယ္ ေအာင္ျမင္တယ္ဆိုရင္ မီး အျပာ ေရာင္ေလး လင္းလာပါလိမ့္မယ္ ။

rootxperiaubyfmam.elf File ထည့္ထားပီးသား ျဖစ္ေနတဲ့ Fastboot Folder ကို ဖြင့္လိုက္ပါ ။ ပီးရင္ Folder ထဲက ေနရာလြတ္ ၁ ေနရာမွာ Shift+Mouse Right Click >Open command window here ကို ေရြးလိုက္ပါ ။ Command Prompt ၁ ခု တတ္လာပါလိမ့္မယ္ ။ 

Command Prompt ေပၚလာပီ ဆိုရင္ ေသခ်ာေအာင္  fastboot devices  ဆိုတာ ရိုက္ပီး Enter ႏွိပ္ပါ ။ fastboot ဆိုတာ ေပၚလာပါလိမ့္မယ္ ။

နာက္ ၁ ေၾကာင္းကေတာ့   fastboot flash boot rootxperiaubyfmam.elf  ဆိုတာ ရိုက္ပီး Enter ထပ္ႏွိပ္ပါ ။

Finish လို႔ေပၚလာပီ ဆိုရင္ Usb ၾကိဳးကို ျဖဳတ္လိုက္ပါ ။ ပီးရင္ Power ဖြင့္လိုက္ပါ ။ Application ေတြ ထဲမွာ SuperUser  ဆိုတဲ့ အေကာင္ေလး ေတြ႕ပီ ဆိုတာနဲ႔ Root လုပ္ျခင္း ေအာင္ျမင္စြာ ပီးစီးသြားပီ ျဖစ္ပါတယ္ ။ အားလံုး အဆင္ေျပၾကပါေစ ။

 * Xperia™ U - Build No, 6.0.B.1.564 ကို Root လုပ္ပီး ေရးထား တာျဖစ္ပါတယ္ ။ Sony ေတြမွာ Android Version ထက္ Build No ကို ၾကည့္မွ အဆင္ေျပပါတယ္ ။ Build No က အေသခ်ာဆံုးျဖစ္ပါတယ္ ။ 

Nokia & sony Syambian ဖုန္း အတြက္ ၿမန္မာေဖာင္႔


Nokia အတြက္ေတာင္းဆိုေနၾကတာမ်ားေနပါျပီ ... အဆင္ေျပေအာင္ ရွာေဖြေမႊေႏွာက္ျပီး တဆင့္ျပန္လည္မွ်ေဝေပးလိုက္ပါတယ္...
Syambian ဖုန္း အတြက္ ၿမန္မာေဖာင္႔  ကို က်န္တဲ႔ ေန ရာ ေတြ မွာေတာ႔ မ ၿမင္ ရေသးေပမဲ႔ website ၾကည္႔ ရင္ ၿမင္ ႏိုင္ မဲ႔ နည္း လမ္းေလး ပါ ဗ်ာ ။ အဆင္ေၿပပါတယ္ E72 မွာ စမ္းၿပီးသြား ပါၿပီ။ ေအာက္က ဖုန္းေတြ မွာ လဲ ရႏိုင္ပါတယ္ ...

HOW TO Root Samsung Galaxy Note With One Click


Prerequisites
Before you root any Android phone, you need to back up your phone’s data. You can back up your contacts to the SD Card and to back up your Applications you can use ASTRO File Manager. In case you need to reset your phone, you can make use of the back up files to restore those applications.


Disclaimer: BlogoTech is not responsible for any damage that might be caused to your device during this process though the possibility of any damage is negligible. Try this at your own risk. Also note, rooting your phone will void your warranty.

Requirements

Steps to root your Note

      1. Download Easy Rooting Toolkit using the link above and extract the contents to a separate folder.
      2. Enable USB Debugging by going to Settings>Applications>Development and make sure USB Debugging is checked.
      3. Connect your Samsung Galaxy Note to the PC via USB Cable and make sure you set it to Charge Only mode.
      4. Open the folder where you have extracted the files in the first step and run runme.bat to root your Note.
      5. After this you need to follow the instructions you get on the screen to root your Note easily.
ref:http://www.blogotechblog.com
၀င္းကမၻာေက်ာ္မွ ထပ္ဆင့္ကူး

Android ဗားရွင္း 4.0 အထက္ေတြမွာ ျမန္မာစာကို မွန္ကုန္စြာမျမင္ရတဲ့သူမ်ားအတြက္ Mozilla Firefox ေနာက္ဆံုးထြက္ V15.0.1


Bokyaw: ကြ်န္ေတာ့္ဖုန္း ( Galaxy S2 ) ကုိ Software update လုပ္လုိက္တာ.. web page ေတြၾကည့္ရင္ ျမန္မာစာ ေတြဖတ္မရေတာ့ဘူး.ျဖစ္ေနတယ္..ေက်းဇူးျပဳျပီး ကူညီပါဦး။

ေျပာလာလို႔ ရွာေဖြျပီး တဆင့္ျပန္လည္မွ်ေဝေပးလိုက္ပါတယ္...။
Android စက္ရုပ္သမားေတြအတြက္ ဗားရွင္း 4.0 အထက္ေတြမွာ ျမန္မာစာကို မွန္ကုန္စြာမျမင္ရတဲ့သူမ်ားအတြက္ ။ ျမန္မာစာကို မွန္ကန္စြာျမင္ရတဲ့ Mozilla Firefox အခုေနာက္ဆံုးထြက္ V15.0.1  ကို တင္ေပးလိုက္ပါတယ္ ေအာက္မွာေဒါင္းပါ ။ 


AutoKiller Memory Optimizer PRO 8.1.1


Root လုပ္ထားတဲ့ Android Device ေတြကို AutoKiller ေလးက အျမန္ႏႈန္းကိုျမင့္ေပးပါလိမ့္မယ္။  Android 2.1 နဲ႔အထက္ အာလံုးအတြက္ပါ..။ ၀င္းကမၻာေက်ာ္မွ ကူး
Requirements: Varies with device
Overview: AutoKiller Memory Optimizer is not a regular task manager.
 AutoKiller is an award winner minfree tweaker, it fine tunes android systems inner memory manager to keep your device fast over time. As a side effect it also lowers battery consumption. Also includes a manual process/service manager.
 - ROOT REQUIRED to set minfree values, unrooted devices will not have this feature
 - if you have questions or you face errors please check home page or write mail
 - for more details see home page
 - donation is only available via paypal atm. because payed apps are not available in all countries yet
 Donators and PRO users receive additional features:
 - no ads
 - alternate preset enabled
 - Chuck Norris mode enabled
 - alternate preset (while screen is off)
 Please be careful, apps with very similar look and name are distributed, they can be malicious.

Nokia ဖံုးက အင္တာနက္ကို PC မွာသံုးမယ္


Nokia ovi suite 3.5 Download
 Nokia ဖုန္းကအင္တာနက္ကို ကြန္ပ်ဳတာနဲ႔ခ်ိတ္သံုးခ်င္ရင္ ဘယ္လိုလုပ္ရမလဲ ေက်းဇူးျပဳျပီး အားတဲ့အခ်ိန္ေျပာျပေပးပါလား....

ဖုန္းတြင္ လုပ္ေဆာင္ရန္

(၁) Menu ကုိ သြားပါ။ Setting မွ တစ္ဆင့္ Connectivity ကုိ သြားပါ။
(၂) USB Data Cable ကုိ ဖြင့္ၿပီး Nokia Ovi Suite ကုိ ေရြးခ်ယ္ပါ။


ကြန္ပ်ဴတာတြင္ လုပ္ေဆာင္ရန္

(၁) Nokia Ovi Suite ေဆာ့၀ဲလ္ကုိ အင္စေတာလုပ္ပါ။
(၂) ဖုန္းကုိ USB ႏွင့္ ခ်ိတ္ဆက္ပါ။
(၃) အင္စေတာလုပ္ၿပီးပါက Nokia Ovi Suite ကုိ ဖြင့္လုိက္ပါ။
(၄) Tool တြင္ Content to Internet ကုိ ေရြးလုိက္ပါ။ APN ႏွင့္ Name တြင္ mptnet ကုိ ျဖည့္ပါ။
(၅) ဖုန္းႏွင့္ ခ်ိတ္ဆက္ေနပါလိမ့္မည္။ ဖုန္းတြင္လည္း E စာလံုးတြင္ ကြင္းေလး၀ုိင္းေနပါလိမ့္မည္။
(၆) Mozilla Firefox တြင္ Tool မွ Option ကုိ ဖြင့္။ Option Box တြင္ Advanced မွ Network မွ Setting တြင္ Auto dectect Proxy ကုိ ေရြးခ်ယ္ၿပီး Ok လုပ္ပါ။

Credit to: ေမာင္ေစတနာ

အေပၚက  ေမာင္ေစတနာ ေျပာျပထားတာကေတာ့ mptnet  ပါေနတဲ႔ အတြက္ေၾကာင့္  ျမန္မာျပည္က သူငယ္ခ်င္းေတြနဲ႔ အဆင္ေျပမယ္ထင္ပါတယ္ .... 
ေတာ္ၾကာအဆင္မေျပဘူးျဖစ္ေနမွာ စိုးလို႔ ေနာက္ထပ္နည္းလမ္း တစ္ခုကို ေအာက္မွာ တစ္ဆင့္ခ်င္း ရွင္းျပထားတာေလးေတြ႕လို႔ မူရင္းအတိုင္း မွ်ေဝေပးလိုက္ပါတယ္..။
First of all You Need Nokia PC suite Software installed on your PC. You can download Nokia PC suite software for your mobile from  Official Link .

 download nokia pc suite

Step 1
Install Nokia PC suite software , if you have done installing of software then Open it up. 
Connect  your Nokia mobile using Data Cable. Also you can Use Bluetooth to connect your Device to Computer. While Connecting your phone , choose Nokia mode as the USB mode that appears on your mobile screen


 Click Next Arrow to continue. Tick I accept the term of service. Click Next Arrow for 5 times.

Step 2
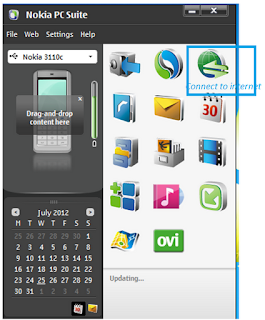
Next , Click on the Nokia PC suite icon on the desktop , it will open and you will get a window like shown below.

Step 3
Next Click on the third Icon " Connect to Internet option "

Step 4.
After Clicking on Connect to Internet , it will show another window that will show Modem Like it is Showing Nokia 3110 C Modem  in the Pic below.

Autoconnect After Clicking On Connect to Internet
Set Access pt. manually by clicking on settings

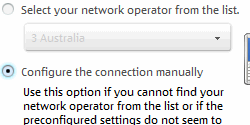
Some of the Operators Connect automatically while for others you have to select  manually  by Clicking on Settings option and set access point settings manually.


When you Choose Configure the connection manually , you have to enter Access point manually . The Access point can be known by calling your Network Customer Care. Here we are not mentioning Access points as they are different for different regions . However mostly it is connected automatically and you can enjoy browsing Internet on your PC.

ဒါကေတာ့ တကယ္လို႔မရေသးရင္......
  Nokia PC suite Install ျပီးေတာ့ Nokia Device ကို ကြန္ျပဴတာက သိေအာင္ အရင္လုပ္ေပးရမဲ့ နည္းပါ..။
Add device Nokia to your PC. Turn On Bluetooth on you mobile first.
On you PC:  Start>Setting>Control Penal>Printer and Other Hardware>Add Device
PC search of device, select your model and it create a code for device. Type the code into your Nokia xxxxx  and click accept.
You are now connected. If it do not connect, go to your Nokia PC Suite that you have installed and click connect to internet

ref: http://net-technews.blogspot.com
၀င္းကမၻာေက်ာ္မွ ကူး

How to Root Samsung Galaxy Tab 7.7 3G/Wi-Fi (GT-P6800/GT-P6810)


မူရင္းအတိုင္းပဲတင္ေပးလိုက္ပါတယ္   စမ္းစရာ Tab 7.7 ကမရွိလို႔ပါ...:P 

Samsung Galaxy Tab 7.7 model  GT-P6800  နဲ႔ GT-P6810 ကို Root လုပ္ႏိုင္ပါတယ္...။


Check out our step-by-step instructions on how to root your Samsung Galaxy Tab 7.7.

Requirements

  • A Samsung Galaxy Tab 7.7 3G+Wi-Fi (model GT-P6800) or Samsung Galaxy Tab 7.7 Wi-Fi (model GT-P6810)
  • Install the latest Samsung KIES on your computer. Get it from Samsung’s Support Page.
  • Backup of your personal data or transfer all files into the tablet’s SD card.
  • Pump your battery to at least 70% (full charge recommended).
  • Disable system tools such as firewall programs and antivirus software prior to rooting.

Caution

  • This rooting guide is intended for the Samsung Galaxy Tab 7.7. Using these rooting instructions or method on another device may cause damage.
  • Your warranty will be voided once you root your tablet.
  • Root your tablet at you own risk. Any damage dealt by the use of this guide will be your sole responsibility.

Instructions

  1. Click  here  to get the rooting package for your tablet (root.zip, 154.4 kB).
  2. Connect your tablet to your PC.
  3. Copy root.zip to the external storage (microSD) of your tablet.  Place the file in the root of the SD card, not inside subfolders.
  4. Disconnect your tablet from the computer.
  5. Turn off the tablet.
  6. Reboot your Samsung Galaxy Tab 7.7 P6800 into recovery mode by pressing the Volume Up key and Power button simultaneously. When the tablet turns on, release the Power button, while keeping the Volume Up key pressed until recovery loads.
  7. Select Install update from External Storage and select root.zip. Confirm the action to initiate the rooting process on your tablet.
  8. When the rooting process is complete, go back to the main menu and reboot your tablet.
  9. After booting, go to the Google Play Store and install the following apps on your tablet: Superuser  and  BusyBox.
  10. Run Superuser and update the su binary.
  11. Launch BusyBox and install your desired busybox version.
  12. Go an extra mile and  install ClockworkMod Recovery on your Galaxy Tab 7.7.
၀င္းကမၻာေက်ာ္မွ ထပ္ကူး